Remember back when we had the guest post of Scary Mommy? Turns out she had asked me for a kicked up recipe for one of her book signing parties. A sweet treat of some sort. She wanted a red treat to go with her logo and new book Scary Mommy. I didn't have exactly red on my mind and was scared she would say "red velvet something or other". Thank goodness she let me go forth and be creative. I said "I have a nice raspberry filled choc...." "SOLD!" she said! I didn't even get to finish what I was saying.
She loved them so much she even featured them on her blog. Bless her. I do love her. With all the fame she has going now, tour dates, press junkets, today show appearances, etc...she is still the same down-to-earth person. She hasn't let fame go to her head. Thank God because I told her I'd kick her ass if she did. ;-)
She's on her book tour right now. You should meet her, she's a love.

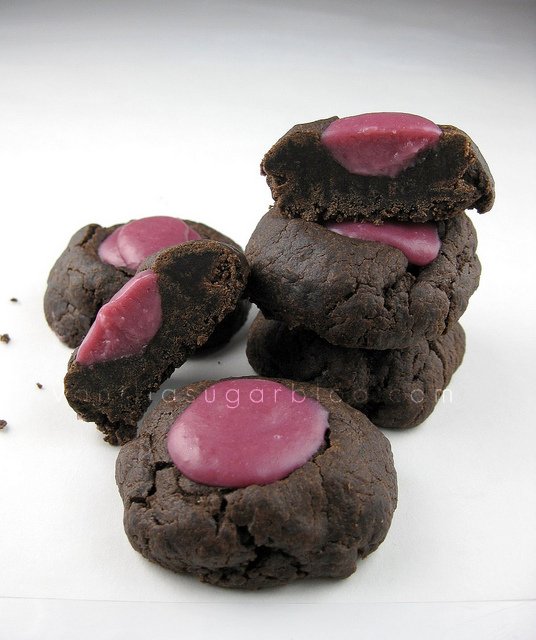
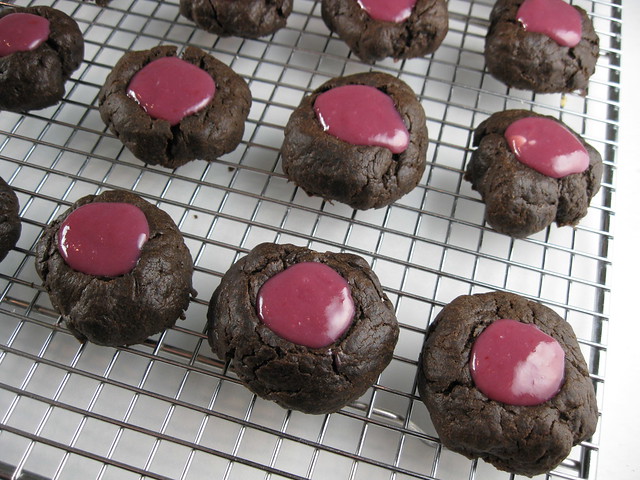
This is what the cookies look like before the white chocolate-raspberry filling has set. And the first photo shows what they look like when they do set up.

It's a very dry dough. A touch or two of milk helps it come together.

Before baking make sure to give the cookie dough balls a little well. After baking you might have to do this again, ever so gently.


raspberry-white chocolate thumbprints
from vanilla sugar blog
print recipe
cookie
1 cup + 2 ½ TB all purpose flour
1/4 cup Dutch processed cocoa
1 & ¾ sticks (7 ounces) unsalted butter, room temp
1/2 cup powdered sugar, sifted
1 and ½ ts pure vanilla extract
2 TB (or more) of whole milk
¼ ts salt
filling
½ cup + 2 TB good quality white chocolate chips or chunks
¼ cup (more or less) raspberry coulis (see below)
raspberry coulis:
1 pint fresh raspberries
2 TB granulated sugar, or to taste
1 TB fresh lemon juice, or to taste
Cook notes: The raspberry coulis can be made a couple days ahead of time. Simply keep it in the fridge, tightly covered until ready to use. When ready to use, please let it come to room temperature before using. The melted white chocolate will seize up if you add a cold coulis to it. If you don’t want to make the coulis you could easily just fill the thumbprints with melted white or dark chocolate. Or even any flavored Hershey kiss would work. It is hard to tell when the cookies are done because of their dark color. They won’t brown, but look for dry cookies or cracked. Don’t bake them any longer than 10 minutes! Mine were done in 8 minutes.
for the coulis:
Put all the ingredients in medium sauce pan and cook over medium (not high!) heat until fruit is mostly dissolved and mixture has reduced a bit as well as thickened up; about 30 minutes or more. Strain through a fine mesh sieve, pushing down on the solids. You might have to let this sit for a while to finish draining—it takes a while. Don’t forget to scrape off the bottom side of the sieve for all the juicy, thickened pulp. Discard the seeds. Taste and add more sugar or lemon juice if needed; it shouldn’t need anything. Cover and refrigerate until ready to serve.
Sift flour and cocoa together into a medium bowl. With a hand mixer or a stand mixer fitted with the paddle attachment, cream butter and sugar on medium speed until light and fluffy, about 2 minutes.
Add the vanilla and salt; continue beating until blended and smooth, about 1 minute more. Add the flour-cocoa mixture and mix on low speed until a soft dough forms, about 1 minute. Then add in the whole milk—it might not need the whole 2 tablespoons, but use enough to help it come together. This is a dry dough, so don’t add in any more than 2 TB. Wrap dough in plastic wrap and chill in the refrigerator until firm enough to roll into balls, about 60 minutes (or longer).
Position a rack in the center of the oven and heat the oven to 350°F. Line two cookie sheets with parchment or nonstick baking liners. Using your palms, roll heaping teaspoonfuls of the dough into 1-inch balls. Or 2-inch balls. Arrange them 2 inches apart on the lined sheets.
With a lightly floured thumb or index finger-tip, press straight down into the middle of each ball almost to the cookie sheet to make a deep well. (Or use the end of a thick-handled wooden spoon.)
Bake one sheet at a time until the tops of the cookies look dry, 8 to 10 minutes.
Gently redefine the indentations with the end of a wooden spoon.
Let the cookies cool on the sheet for 5 minutes and then let them cool completely on racks. If you’ve made the coulis ahead of time, now is the time to take it out of the fridge and let come to room temperature.
For the filling:
Put the white chocolate over a double boiler over low heat. Melt slowly and keep stirring until melted. Once melted add in the raspberry coulis, slowly, a bit at a time, all the while stirring. You can use as much or a little raspberry coulis as you like. The coulis is strong, so a ¼ cup is plenty.
Using a small spoon simply fill each cookie with a teaspoon amount of filling. You could also pour the chocolate mixture into a pastry bag or plastic bag and pipe in the filling. I found a small spoon to work wonders. Cool completely before serving or storing. Should make: if you rolled them into 1-inch balls about 34-36 cookies; if you rolled them into 2-inch balls about 16-19 cookies.

Super cute cookies!
ReplyDeleteWOW they look incredible! I will have to try these really soon!
ReplyDeletewww.annasspagblog.blogspot.com
These look different and fun, I especially like that raspberry white chocolate concoction...I am thinking of other uses for it already!
ReplyDeleteChocolate and raspberry were made for each other! Kind of like chocolate and ME were made for each other!
ReplyDeleteI would gladly take about 15 of those off your hands...
:)
What a cute idea for Scary Mommy's book signings! Besides, chocolate on chocolate with raspberries can't go wrong...love the coulis idea, even though I'm not a huge white chocolate fan. But mixing the two sure gives it an interesting color and texture. How would that raspberry coulis taste on vanilla ice cream? I keep thinking melba sauce here.
ReplyDeleteI might be tempted to just drink the filling. But maybe that's just me?
ReplyDeletewhite chocolate + raspberry filling in a really dark cookie, thumbprint/stuffed style..this has about 10 things going for it that I love. They're gorgeous!
ReplyDeleteoh my gosh! Who wouldn't want to feature these on their blog? THey're beautiful and drool worthy. Dawn- you have the best sweet creations
ReplyDeleteThe raspberry makes these paleo. Nuf said!!
ReplyDeleteThese look fabulous!
ReplyDeleteMmm I love the picture of the one with the middle dripping down.
ReplyDeleteI'm not a huge fan of raspberry or white chocolate, but you always have a way of making them sound good to me.
ReplyDeleteI am drooling! My favorite flavors, all in one! Thanks for the recipe!
ReplyDeletethese are beautiful! i'll have to try them soon. :)
ReplyDeleteThese are so cute! Having seen numerous 'thumb print' type cookies before, I really like the dark on light color reversal!
ReplyDeleteCheers!
BOOKMARKED! My whole family will LOVE me when I make these for them. Amazing!
ReplyDeleteI LOVE raspberry anything, but never pair it with chocolate much - these look great!
ReplyDeleteI gave you an award on my blog :) http://www.savvykitchen.blogspot.com/2012/04/versatile-blogger-award.html
ReplyDeleteI loooooove raspberry coulis! Never thought of mixing it with white chocolate. I'm not surprised she went wild for them, they look divine!
ReplyDeleteAmazing colors, the raspberry and white chocolate combo looks delicious! Awesome! And thanks for visiting my blog!
ReplyDeletei love the startling color contrast, and the flavors sound great together!
ReplyDeleteI love the colors on this. Great great pick :)
ReplyDelete